Display Modules
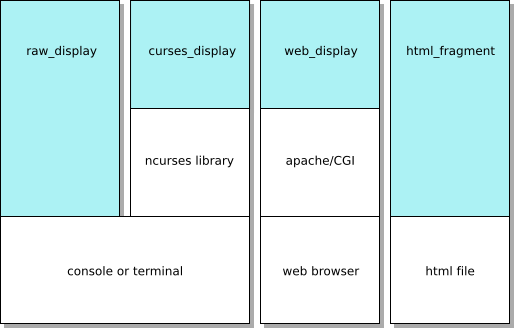
Urwid’s display modules provide a layer of abstraction for drawing to the screen and reading user input. The display module you choose will depend on how you plan to use Urwid.

Typically you will select a display module by passing it to your
MainLoop constructor, eg:
loop = MainLoop(widget, ..., screen=urwid.curses_display.Screen())
If you don’t specify a display module, the default main loop will use
raw_display.Screen by default
# These are the same
loop = MainLoop(widget, ...)
loop = MainLoop(widget, ..., screen=urwid.raw_display.Screen())
Raw and Curses Display Modules
Urwid has two display modules for displaying to terminals or the console.
The raw_display.Screen module is a pure-python display module with no
external dependencies. It sends and interprets terminal escape sequences
directly. This is the default display module used by
MainLoop.
The curses_display.Screen module uses the curses or ncurses library
provided by the operating system. The library does some optimization of screen
updates and uses termcap to adjust to the user’s terminal.
The (n)curses library will disable colors if it detects a monochrome terminal,
so a separate set of attributes should be given for monochrome mode when
registering a palette with curses_display.Screen High colors will not be
used by the curses_display.Screen module. See Setting a Palette
below.
This table summarizes the differences between the two modules:
| raw_display | curses_display | |
|---|---|---|
| optimized C code | no | YES |
| compatible with any terminal | no | YES [1] |
| UTF-8 support | YES | YES [2] |
| bright foreground without bold | YES [3] | no |
| 88- or 256-color support | YES | no |
| mouse dragging support | YES | no |
| external event loop support | YES | no |
| [1] | if the termcap entry exists and TERM environment variable is set correctly |
| [2] | if python is linked against the wide version of ncurses |
| [3] | when using xterm or gnome-terminal |
Other Display Modules
CGI Web Display Module web_display
The urwid.web_display module lets you run your application as a CGI
script under Apache instead of running it in a terminal.
This module is a proof of concept. There are security and responsiveness issues that need to be resolved before this module is recommended for production use.
The tour.py and calc.py example programs demonstrate use of this module.
Screenshot Display Module html_fragment
Screenshots of Urwid interfaces can be rendered in plain HTML. The
html_fragment.HtmlGenerator display module lets you do this by simulating user input
and capturing the screen as fragments of HTML each time
html_fragment.HtmlGenerator.draw_screen() is
called.
These fragments may be included in HTML documents. They will be rendered
properly by any browser that uses a monospaced font for text that appears in
<pre> tags. HTML screenshots have text that is searchable and selectable in
a web browser, and they will shrink and grow when a user changes their
browser’s text size.
The example screenshots are generated with this display module.
LCD Display Module lcd_display
Almost any device that displays characters in a grid can be used as a
screen. The lcd_display module has some base classes for simple
LCD character display devices and a complete implementation of a
lcd_display.CF635Screen for Crystal Fontz 635 USB displays with
6 buttons.
The lcd_cf635.py example program demonstrates use of this module.
See also
Setting a Palette
The MainLoop constructor takes a palette parameter that it passes
to the register_palette() method of your display module.
A palette is a list of display attribute names and foreground and background settings. Display modules may be run in monochrome, normal or high color modes and you can set different foregrounds and backgrounds for each mode as part of your palette. eg:
loop = MainLoop(widget, palette=[
    ('headings', 'white,underline', 'black', 'bold,underline'), # bold text in monochrome mode
    ('body_text', 'dark cyan', 'light gray'),
    ('buttons', 'yellow', 'dark green', 'standout'),
    ('section_text', 'body_text'), # alias to body_text
    ])
The Display Attributes section of this manual describes all the options available.
